If you see transfer speeds bouncing up and down on any system (Windows PC, Linux Server, network appliance, NAS disk, firewall, router…), the most likely cause is at the physical layer. That means that you likely have a bad cable, poor physical connection or your equipment is not auto-negotiating a speed properly.
Testing for a bad connection or cable is easy enough by simply swapping in a new cable and seeing if that fixes the problem. However, the problem is very often caused by the network cards at each end not autonegotiating correctly. You can easily resolve auto-negotiation problems by simply setting your network cards to run at a specific speed and duplex. For instance in Windows, you 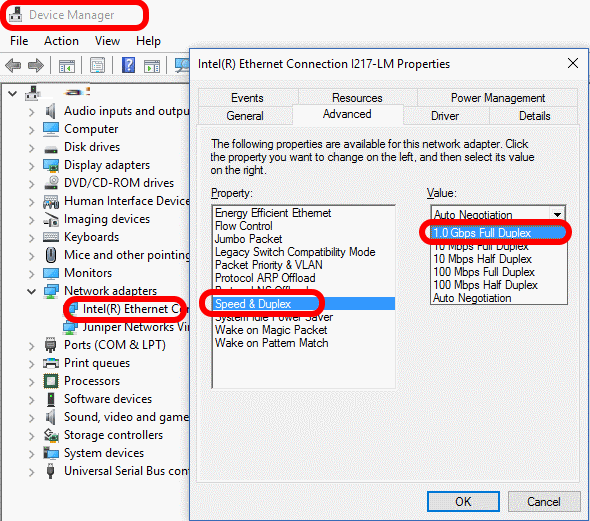 simply:
- launch your DEVICE MANAGER,
- double click on the network card
- select the ADVANCED TAB
- select SPEED & DUPLEX from the PROPERTY list
- change the VALUE to what you want (usually 1.0 GB FULL DUPLEX)
For me, the problem came in when I had a Windows Server on one end (which I set using the above simple process) and a Juniper SRX Firewall on the other end. Below are the steps to configure a Juniper firewall, switch or router to have a port run at a specific speed:
 SSH to your Juniper console (I like Putty. Just enter the IP and press enter… good)
- Enter the root username and password as prompted
- Type CLI and press ENTER
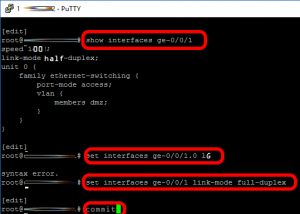
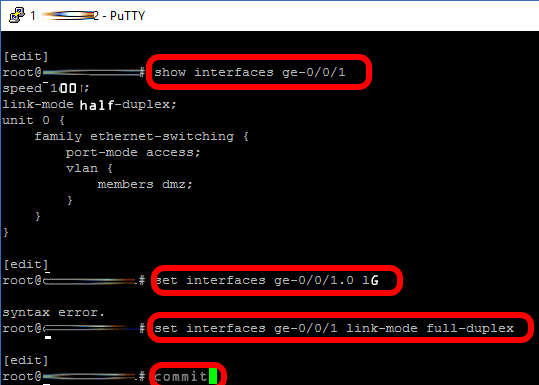
- Type show interfaces ge-0/0/1 (sub in the port number you actually want to look at) and press ENTER
this shows you the speed of the port in question. In this example it displays the information for the second physical port on the Juniper device (because the first physical port is number ‘zero’). The word EXTENSIVE can be added if you want a huge amount of detail:
.
root@FW1-CHEST> show interfaces ge-0/0/1 extensive
Physical interface: ge-0/0/1, Enabled, Physical link is Up Interface index: 135, SNMP ifIndex: 510, Generation: 138 Link-level type: Ethernet, MTU: 1514, Link-mode: Half-duplex, Speed: 100mbps, BPDU Error: None, MAC-REWRITE Error: Auto-negotiation: Enabled, Remote fault: Online
.
In my case, you can see the port was running at HALF Duplex and just at 100MBs, that is bad… very bad. I have not seen a network card that did not support FULL DUPLEX since about 1995. I could have tolerated the 100MB but if you have half duplex set at one end and full duplex set at the other, you will be in Hell, and I was.
. - Type the following JunOS commands (obviously subbing in the port number you actually want to effect. Again, this will affect port 1 which is the second port on the Juniper switch/firewall/router):
.set interfaces ge-0/0/1 link-mode full-duplex and press ENTER
set interfaces ge-0/0/1 1G and press ENTER
.
- Type COMMIT and press ENTER. There are lots of COMMIT options you can read about HERE but if just want to make the changes now, just type COMMIT.


0 Comments