By Ian Matthews, Up & Running Technologies Inc, Sept 1, 2009 Last Updated March 14, 2010
You should know three things before you start:
-
I am a definite newbie to Exchange, which is why this I thought I could do a good job creating this documentation for newbies.
-
I am writing this primarily for myself as a cookbook for future Exchange installations. It is provided WITHOUT WARRENTY OR GUARANTY OF ANY SORT. USE AT YOUR OWN RISK!
-
You should review part one of our newbies guide titled HOW TO SETUP EXCHANGE 2007 IN 2 HOURS
This page is all about the more advanced topics like backup, scripts, and policies. The following items are in the order of which I thought of them (i.e. no order) so lets get to it.
A – HOW TO SET / LIMIT ATTACHMENT SIZE:
-
If you want/need to change email attachment size limits, mailbox size limits or activesync attachments limits, look at the following self explanatory screen shots:


B – HOW TO ADD A FOOTER or DISCLAIMER:
You can easily add a footer / disclaimer to all messages by adding a simple Transport rule:
-
Go to ORGANIZATION CONFIGURATION, HUB TRANSPORT, TRANSPORT RULES tab.
-
Right click and select NEW TRANSPORT RULE
-
 As you can see in the screen shot below, I have created a rule using SENT TO USERS INSIDE OR OUTSIDE THE ORGANIZATION (and selected OUTSIDE) and then APPEND DISCLAIMER TEXT…
 -
I also used an EXCEPT WHEN TEXT PATTERNS APPEAR… . This will stop the disclaimer from being duplicated, which can easily occur if a message becomes a back and forth conversation.

C – HOW TO ENABLE LCR: LOCAL CONTINUOUS REPLICATION
LCR is a fantastic new feature in 2007 which lets you keep a near line copy of your Exchange database on different hard disks on the same server. If your hard disks fail… you just switch to the LCR copy… NICE! Other than a problem with the free Windows Server Backup listed in item E:, this works really well and everyone should be using it (or its big brother CCR which we are not going to cover here). For more details read THIS or THIS.
-
Go to SERVER CONFIGURATION, MAIL BOX, select (i.e. click on) FIRST STORAGE GROUP and choose ENABLE LOCAL CONTINOUS REPLICATION from the Action Pane.
-
On the next two screens browse to a drive other than the one your logs and database are currently stored on. Not just a different partition… use a different disk. You can see on mine, I choose an external USB disk; if I had a busy server the USB would likely be a bad idea, but my server is low use.


D – HOW TO CONFIGURE ROOM / EQUIPMENT RESERVATIONS
-
 Create new ROOM mail box in the Exchange Console (or command line).
 -
Using ‘Active Directory Users and Computers’ enable the room account (because Exchange DISABLES all room accounts)
-
Set the the mail box to AutoRespond to Meeting requests, you can do this via Outlook 2007, OWA or the Exchange Management Shell.
-
OUTLOOK:
-
 Log into the account using Outlook 2007 (or newer). If you already have an Outlook profile on the machine you are using, you will need to go to the MAIL applet in the Control Panel and Create a NEW profile.
 -
Go to Tools, Options, Calendar Options, Resource Scheduling and check the first two options (“Automatically accept meeting requests and process cancellations” and “Automatically decline conflicting meeting requests”). Click OK a thousand times to clear all the open dialog boxes and then close Outlook.
-
-
 Outlook Web Access:
-
Log into the OWA account for the boardroom, click OPTIONS (top right) then click RESOURCE OPTIONS and make the obvious choices (see 1B above if you are confused). Don’t forget to click SAVE (at the top) when you are done.
-
-
Management Shell:
Set-MailboxCalendarSettings “BoardroomA”-AutomateProcessing:AutoAccept
and you also might want to set
Set-MailboxCalendarSettings “BoardroomA” -AllowConflicts:$Falseand then use the following command to verify
get-mailboxcalendarsettings -identity “BoardroomA” | fl
-
-
Using ‘Active Directory Users and Computers’ RE-DISable the room account.


If you want more details read THIS or THIS or THIS or THIS.
E – HOW TO CREATE MAILING / DISTRIBUTION LISTS
The only trick here is that Microsoft has removed the ability to “mail enable” Active Directory groups which are not “Universal” and yes, in previous versions of Exchange you could use non-Universal groups.
So, simply launch the Exchange Management Shell, expand RECIPIENT CONFIGURATION, click DISTRIBUTION GROUP. Then click the NEW DISTRIBUTION GROUP link in the Action Pane and follow the obvious prompts.
If you need more information about types and options, read THIS or THIS.
F – HOW TO SET RETENTION ON OUTLOOKS JUNK EMAIL FOLDER:
This information have been copied verbatim from an MS tech going by ‘Bob’ Huang; very clear and easy:
-
CREATE A POLICY:
-
Open Exchange Management Console, go to “Organization Configuration”->”Mailbox”.
-
Click “Managed Default Folders” tab, right click “Junk E-mail”, click “New Managed Content Settings”.
-
Specify a name, and select “All Mailbox Content” in the “Message type”.
-
Check “Length of retention period(days)” option, type 15 in the blank box.
-
Select “When delivered, end date for calendar and recurring tasks” under “Retention period starts”, select “Delete and Allow Recovery” (as you like) under “Action to take at the end of the retention period”, then click “Next”.
-
If you do not need Journaling, click “Next” to skip the Journaling page.
-
Check the Configuration Summary and click “New” to finish it.
-
-
GROUP YOUR POLICIES (yes, this likely be a group of 1):
-
Then click the “Managed Folder Mailbox Policies” tab, click “New Managed Folder Mailbox Policy” in the right pane.
-
Specify a policy name (e.g. testJunk), click “Add”, select “Junk E-mail”, click “OK”.
-
Click “New” to finish the configuration.
-
-
APPLY THE POLICY:
-
Go to “Recipient Configuration”->”Mailbox”, open the “Properties” of one user.
-
Click “Mailbox Settings” tab, select “Messaging Records Management”, then click “Properties”.
-
Check “Managed folder mailbox policy”, click “Browse”, select “testJunk” which we have just created and click OK so that the mailbox policy is applied on this specific user.
NOTE: Instead of step 11 to 14, if you want to apply this policy in bulk for everyone on the Exchange server, you can run the following command in Exchange Management Shell:
Get-mailbox -server <servername> | set-mailbox -ManagedFolderMailboxPolicy testJunk
and yes you will need to apply this every time a new mailbox is created.
-
-
SCHEDULE THE POLICY TO RUN:
-
In the console tree, expand Server Configuration, and then click Mailbox.
-
In the result pane, right-click the Mailbox server for which you want to schedule the managed folder assistant, and then click Properties.
-
Click the Messaging Records Management tab.
-
In the Schedule the Managed Folder Assistant box, select Use Custom Schedule, and then click Customize.
-
In Schedule, select the times and days during which you want the managed folder assistant to run and click OK to Finish.
-
G – IMPORTANT COMMAND LINES and SCRIPTS:
Exchange 2007 has an excellent command line
![]() Command line troubleshooting and testing tools very easy to use. Go to the Exchange scripts folder and type HELP TEST for a complete list of cool TEST tools:
Command line troubleshooting and testing tools very easy to use. Go to the Exchange scripts folder and type HELP TEST for a complete list of cool TEST tools:
-
To check a summary of your configuration use:
get-OrganizationConfig -
To check your overall system health use:
Test-SystemHealth NOTE: If this shows nothing but the prompt, you are good to go
and
Test-ServiceHealth
and
Test-MailFlow
and
Test-WebServicesConnectivity
(first you need to create a special test users soooo, start and Exchange Management Shell and type:
cd $exscripts
get-mailboxServer | .\new-TestCasConnectivityUser.ps1
set a password when asked and then run Test-WebServicesConnectivity ) -
and see THIS article for many more with clear explanations
-
To view the Email Queue use:
Get-queue -
To view Storage Groups use
Get-StorageGroup -
To perform a “Consistency Check” on your database, Dismount the storage groups database in question (I do this though the GUI) and then use:
eseutil /mh “C:\Program Files\Microsoft\Exchange Server\Mailbox\First Storage Group\Mailbox Database.edb”
In particular, you should look for a State: Clean Shutdown entry
You can even add free scripts like THESE written by non-Microsoft staff en enhance your capabilities.
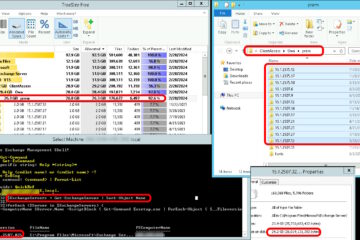
H – HOW TO EXPORT TO A .PST FILE FROM THE EXCHANGE SERVER:
If you want to export a mailbox to a .PST file you must be using the 32Bit version of Exchange Management tools on a machine with Outlook installed on it. You also MUST have full control permission on the mailbox in question. You can use the Exchange Management Console GUI to add full control to the ones you care about or you can use the Exchange Management Shell command line:
Get-mailbox | Add-MailboxPermission –user “<YourNameHere>” –accessright Fullaccess
Then you can export using:
Export-Mailbox -Identity <name-of-mailbox> – baditemlimit 10000 -PSTFolderPath c:\
If you want to export ALL of your mailboxes to separate .PST’s use:
Get-Mailbox -Database “Mailbox Database” | Export-Mailbox – baditemlimit 10000 -PSTFolderPath c:\
THIS is an excellent 3 minute video which explains the process in detail and THIS is an excellent Microsoft article on the Export command.
I – ADVANCED ANTISPAM TOPICS:
-
FOREFRONT: If you want to see how to install Forefront Protection 2010 for Exchange read my short instructions HERE, otherwise, read the rest of this section:
-
SCRIPTS: You can test the effectiveness of your AnitSpam by using some integrated scripts which as hidden in the x:\Program Files\Microsoft\Exchange Server\Scripts folder. Torun these you need to be in the Exchange Management SHELL.
-
get-antispamSCLHistogram.ps1
-
get-AntispamTopBlockedSenderDomains.ps1 p1
-
Get-AntispamTopRecipients.ps1
-
get-AntispamTopRBLProviders.ps1
-
get-AntispamFilteringReport.ps1 messagesrejected -startDate:07-20-2009 -endDate:08-25-2009
Note if you get an error message with this command you likely have entered dates which are not contained in your logs (i.e. see the next point for more details). -
Get-queue
-
-
SAFE SENDERS: Safe Senders created by users in Outlook are NOT exempt from the Exchange Server level AntiSpam checks (i.e. RBLs…). If you want to ensure that SAFE SENDERS are indeed white listed to skip all the server checks, you need to perform a “safe senders aggregation”, which you can easly do by reading THIS.
-
JUNK THRESHOLD: According to the Best Practices Analyzer and THIS article, you need to lower the Spam Confidence level via the Exchange shell to a rating of 4 (down from 8). To do this simply start the Exchange Shell and type:
Set-OrganizationConfig -SCLJunkThreshold 4
-
WHITELISTS: I recommend THIS free script which creates a basic GUI to handle Whitelists. If you want to mange them by hand, read the rest of this bullet.
If you want to “whitelist” a specific domain (and subdomainds) or email address, use the following (or read THIS).
Set-ContentFilterConfig -BypassedSenderDomains *.somedomain.com, *3someotherdomain.com
or
Set-ContentFilterConfig -BypassedSenders foo@somedomain.com,foo2@somedomain.comand then you can view the Bypass/White list with:
(Get-ContentFilterConfig).BypassedSenderDomains
or
(Get-ContentFilterConfig).BypassedSenders
or
Get-ContentFilterConfig | Format-List BypassedSenders,BypassedSenderDomains** NOTE ** When you use the SET-CONTENT… command it OVERWRITES (i.e. does NOT append) your list. If you need to ADD more items to your list use the code below and read THIS for more detail:
$foo=Get-ContentFilterConfig
$foo.BypassedSenderDomains +=”somedomain.com”
$foo | Set-ContentFilterConfig -
LOGS: AntiSpam logs are only kept for 30 days or until they reach 250MB in size. If you are like me and want to produce reports for a longer period of time (say 90 days with 500MB of folder space and 20MB files, you need to do edit the following (read THIS if you are lost):
-
\Program Files\Microsoft\ExchangeServer\Bin\EdgeTransport.exe.config and add
<add key=”AgentLogMaxDirectorySize” value=”524288000″ />
<add key=”AgentLogMaxFileSize” value=”20971520″ />
<add key=”AgentLogMaxAge” value=”90.00:00:00″ />
-
-
LOG LOCATION: The AntiSpam logs are in plain techy English and can be opened here:
\Program Files\Microsoft\Exchange Server\TransportRoles\Logs\AgentLog -
CAHCE SIZE: On a slightly related note, according to the Best Practices Analyzer and THIS Microsoft article, if your server has more than 4GB or memory, you should change the Database Cache Size from 128MB to 512MB in that same CONFIG file… so why not do it now:
<add key = “DatabaseMaxCacheSize” value=”536870912″ />
J – HOW TO BACKUP EXCHANGE 2007 WITH WINDOWS SERVER BACKUP:
Service Pack 2 (SP2) adds the ability to backup and restore Exchange databases using Windows Server Backup. If you need more information, read THIS.
 If the backup or restore is having issues go to the server that is hosting exchange and run VSSADMIN LIST WRITERS from the command line. Ensure that all the writers are in a Stable State and have No error. The experience has been that the issue will be with the Microsoft Exchange Writer and the Shadow Copy Optimization Writer.
** Note ** that LCR (Local Continuous Replication) MUST BE DISABLED if you want to use Windows Server Backup, other wise you will get “Consistency check failed for component ‘Microsoft Exchange Server\Microsoft Information Store\…” errors. Also note that LCR is NOT a problem when using BackupExec.
K – HOW TO RESTORE A MAILBOX USING SYMANTEC BACKUPEXEC:
This segment was written by Up & Running’s Patrick Bergen for those of you with BackupExec and yes, this does apply to both SBS (Small Business Server Backup Exec and Standard Backup Exec).
-
Using the Exchange Management Console (or command line), create a new user. Note; unless you have the BackupExec Active Directory agent, there is no way to have BUExec create the account for you so you do need to create a new user.
-
Send an email to the newly created account. This will initialize your new account. (It will not work if there is no information in the account.)
-
Start BackupExec 12.5 (or newer) and start a New Restore Job.
-
 In Selections choose the entire account under Microsoft Information Store, First Storage Group, Mailbox Database. If you want to restore only parts of the mailbox (i.e. certain mail messages) then choose just those.
 -
 Choose Microsoft Exchange Redirection. Choose the Redirect Exchange sets box. Fill in the Exchange server name in Restore to server field. Choose the Redirect mailboxes or public folders box and the Redirect mailbox sets radio button. Enter the account name in the Restore to mailbox field.
 -
Choose Notification and select the recipient and check the include job log with a notification to an email or printer receipt box. Then choose Run Now and OK.
-
 Note: If the backup or restore is having issues go to the server that is hosting exchange and run VSSADMIN LIST WRITERS from the command line. Ensure that all the writers are in a Stable State and have No error. The experience has been that the issue will be with the Microsoft Exchange Writer and the Shadow Copy Optimization Writer.


L – HOW TO SET THE “MY SITE” LINK IN OWA
Use Active Directory Users and Computers and set the WEB PAGE filed on the GENERAL TAB to a web address (yes, you need the http:// prefix for this to work.) Then the MY SITE link at the top of OWA will work.
M – CAN NOT LOG INTO OWA:
If you see the following when trying to log into OWA:
| A problem occurred while trying to use your mailbox. Please contact technical support for your organization.
DETAILS: |
you likely need to make a quick and minor adjustment to your Active Directory Users & Computers:
- In Active Directory Users & Computers, right-click their user object and choose properties
- Click on the SECURITY tab, then advanced
- Ensure, “Allow inheritable permissions from the parent to propagate to this object…” is checked, if not, check it and click OK.
- Wait for AD to replicate, then try logging into OWA as that user.
Click HERE for more details, if you care.
Z – OTHER TOPICS:
- BRAND OWA: If you want to customize / brand the OWA colours, logos… read this.
- IPv6: READ THIS!!! If you have problems with you autodiscover when the Outlook client is running from the internet (i.e. off the LAN) or if Outlook is prompting for your credentials (user name and password) when it should not be, then you likely have IPv6 still running. NOTE: Unchecking the IPv6 checkbox on the network card, will not cut it. If you PING LOCALHOST and see something like “Reply from fe80::1%1: time<1ms” then you need to read THIS and THIS and THIS .
1 Comment
Homepage · December 11, 2019 at 4:26 am
… [Trackback]
[…] Informations on that Topic: urtech.ca/2010/08/a-newbies-guide-to-configuring-exchange-advanced-topics/ […]