I needed to import a certificate into a Server 2016 RDS server but it was requesting a .PFX file I did not have, so I had a problem. The certificate I wanted the RDS to use was already installed and functional but the RDS CONFIGURE THE DEPLOYMENT did not show the cert.
How to Create a .PFX File From An Already Installed Certificate:
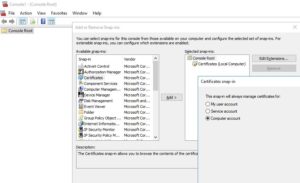 Launch a new MMC
- Click START and type MMC.EXE then press the ENTER key
- Add the CERTIFICATE add-in
- Click FILE > ADD/REMOVE SNAP IN
- Double click CERTIFICATES
- Select COMPUTER ACCOUNT > click NEXT > leave it on LOCAL COMPUTER and click the FINISH button
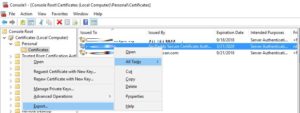
- Expand CERTIFICATES > PERSONAL > CERTIFICATES
- Right click on the certificate in question (likely one issued by a 3rd party like GoDaddy) and select ALL TASKS > EXPORT
 Click NEXT button on the CERTIFICATE EXPORT WIZARD > YES, EXPORT THE PRIVATE KEY > NEXT button
- Click the PASSWORD checkbox and type the same password into both fields and click NEXT
- Click BROWSE and set a location a file name
In my case I then had to import the .PFX certificate into the the RDS system, but you may want to do something different with yours.
How to Import a .PFX Certificate Into Server 2016 RDS:
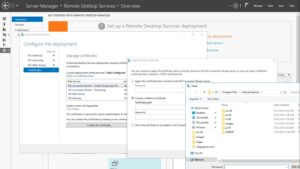 Launch SERVER MANAGER
- Click REMOTE DESKTOP SERVICES
- Click OVERVIEW or COLLECTIONS
- Click TASKS (top right corner)
- Select EDIT DEPLOYMENT PROPERTIES
- Click CERTIFICATES > RD CONNECTION BROKER – SINGLE
- Click SELECT EXISTING CERTIFICATE button
- Browse to your .PFX file, enter the password you created in step 6 above, and place a check in ALL THE CERTIFICATE TO BE ADDED TO THE TRUSTED ROOT… then click OK
- Click the APPLY button
- You can only make one certificate change at a time
- Click RD CONNECTION BROKER – PUBLISHING
- Click APPLY THE CERTIFICATE THAT IS STORED ON THE RD CONNECTION BROKER SERVER
- Enter the password you created in step 6 above, and place a check in ALL THE CERTIFICATE TO BE ADDED TO THE TRUSTED ROOT… then click OK
- Repeat steps 10 to 12 for the RD WEB ACCESS and RD GATEWAY
- Have a nice day

2 Comments
Hellen · November 22, 2022 at 4:32 pm
There is something in this. I will know, thank you very much for your help in this matter.
Randy · March 29, 2019 at 9:51 am
Thanks so much for this and a couple other related articles. Once Google helped me find them I had all my questions answered and certificates set up on our RDS server. I appreciate this!!!