Windows Admin Center was code named Project Honolulu during its development cycles. It went live in April 2018 and was titled “Our Re-imagined Management Experience” for good reason.
At Ignite 2018 in Florida Microsoft drove home a few points over and over and over again. One of those points was get on Windows Admin Center now. So strip away the hype and ask why should you use Windows Admin Center (WAC)
- WAC is a web based management console that is intended to replace most of the MMC’s you are using today
- Note that it does not yet have AD Users and Computers, DHCP, DNS and IIS tools yet, so you still need your old RSAT tools for now
- In fact, there are new features in Windows Admin Center that are not in the regular MMC and those features will not be coming to the MMCs
- Microsoft claims that is loads faster than most MMC’s which is a real boost over slow management tools like SERVER MANAGER
- WAC supports local installed servers and cloud products like Azure
So lets get to it:
How To Install Windows Admin Center
You can install the Admin Center on any Windows Server 2012 (or newer ) or Windows 10 PC you want but because it is a web based tool you are likely going to want to install it on a server and then use your browser (yes, it supports Chrome and Edge but does NOT support IE11) to connect to it from your Windows 10 PC.
 Download the latest Windows Admin Center from Microsoft HERE
- Run through the easy installation wizard on any Server 2012 or newer box EXCEPT Domain Controllers
- Do’t worry about it; if you try to install on a DC it will error out with a nice message telling you why
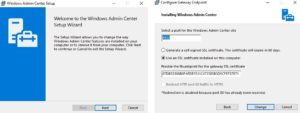
- During the install it will tell you if it thinks port 80 is used and it will suggest an alternate port. As you can see in the screenshots to the right, I changed mine to port 4433
- Note that you will need to:
- put up with the SSL errors
- buy a cert
- add the cert to your Trusted Root
How To Use Windows Admin Center
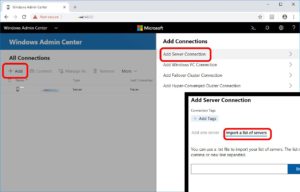 Export your SERVERS from Active Directory (i.e. right click on the OU they are stored in and select EXPORT LIST and select CSV
- Edit that CSV and remove the column headers or extra column data (like the word COMPUTER).
- If you don’t WAC will import them as Servers and you can delete them manually
- Use Chrome or Edge to connect to it the WAC you just installed using <host-name>:port (i.e. https:\\ur-vm-ms1:443 )
- Click the ADD button and select ADD SERVER CONNECTION
- Either type in the server names manually or click IMPORT LIST OF SERVERS as you see in the screenshot to the right
Repeat the same steps above for any PC’s, Clusters, or Hyper-Converged Clusters.

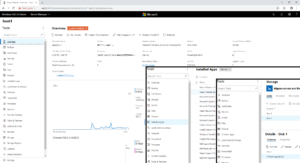 Click on any server you are interested in see what is available. If you click on something and it makes a change that takes more than a few seconds, you do NOT have to wait for it to finish. The page will load a popup in the top right corner of the screen giving you the status of any changes.
I thought the WAC was going to be a thin veneer displaying basic information about servers, but it is quite deep and encourages configuration changes.
In the top right corner of the page there is a >_ icon which will give you the PowerShell of any action, which might prove very helpful in the future.
Watch this 2 minute overview for a quick ‘get up to speed’:


0 Comments