If you have devices (DVD, Mouse, USB Port…) that are not functioning as you expect one common troubleshooting technique is to remove the device and driver from Windows then reboot and let Windows “Plug-and-Play” it back into existence. Hopefully, the default setting or updated / fresh driver that Windows finds resolves the failure.
Here are the four ways to accomplish this in Windows 10, Server 2016 and Server 2019:
A – DEVICE MANAGER
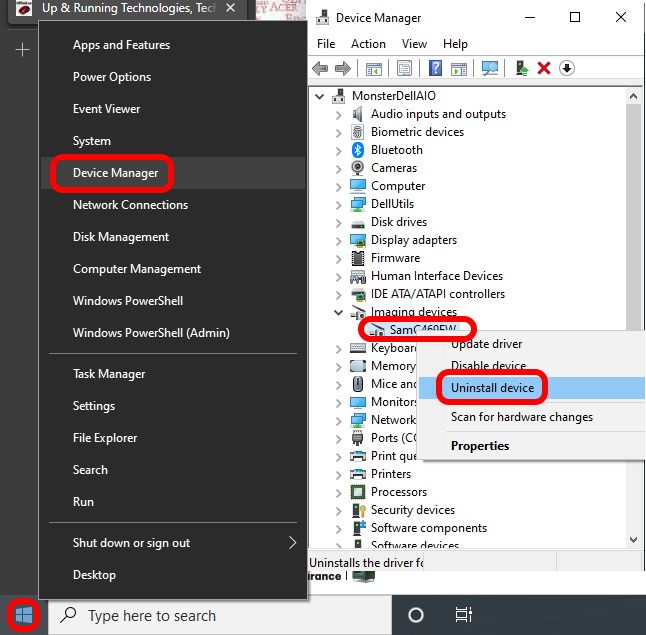
- Right Click on the START button and select DEVICE MANAGER
- Open DEVICE MANAGER by using its name:
- Type DEVMGMT.MSC and press the ENTER key on your keyboard
- Find the problematic device, right click on it and select UNINSTALL DEVICE
WINDOWS INDICATES YOU ARE NOT AN ADMIN, WHEN YOU ARE
If you are NOT an administrator and you open DEVICE MANAGER it will prompt you with that fact. In those cases you are intentionally blocked from making system wide changes, for the obvious reason, that you are not an admin.
However, there have been reports of users who are an Admins being blocked from removing devices from DEVICE MANAGER because it claims they are not Admins. In this case opening DEVICE MANAGER via a COMMAND PROMPT, hacking the registry or using a utility may help.
B – COMMAND LINE TO DEVICE MANAGER
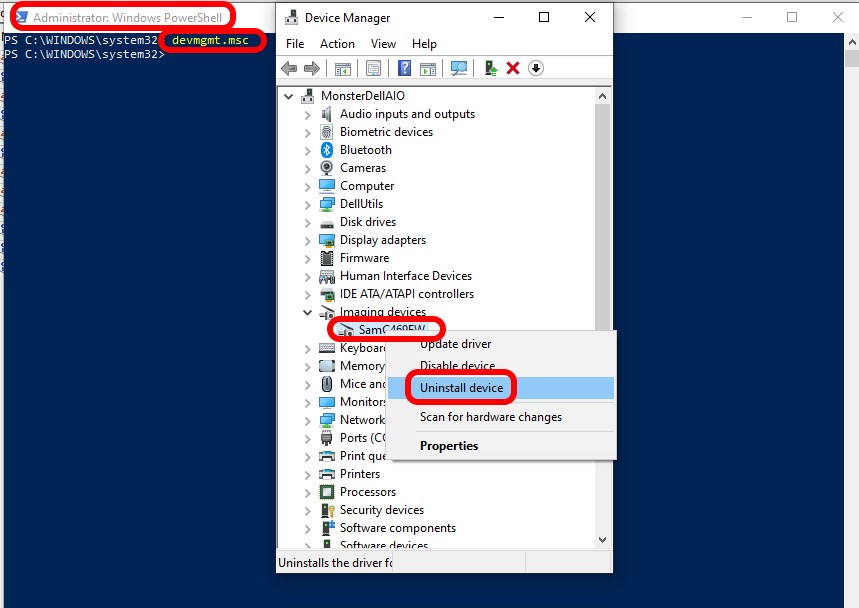
- Open a COMMAND PROMPT or POWERSHELL as an administrator:
- Right click on the START button and select WINDOWS POWER SHELL (AS AN ADMINISTRATOR) or COMMAND PROMPT (AS AD ADMINISTRATOR)
- Click YES on the DO YOU WANT TO ALLOWS THIS APP TO MAKE CHANGES TO YOUR DEVICE? prompt.
- If you do not receive that prompt, you have a problem. Most likely, the account you are using is not a administrator of the PC you are on.
- Open DEVICE MANAGER by using its name:
- Type DEVMGMT.MSC and press the ENTER key on your keyboard
- Find the problematic device, right click on it and select UNINSTALL DEVICE
C – REGISTRY HACK:
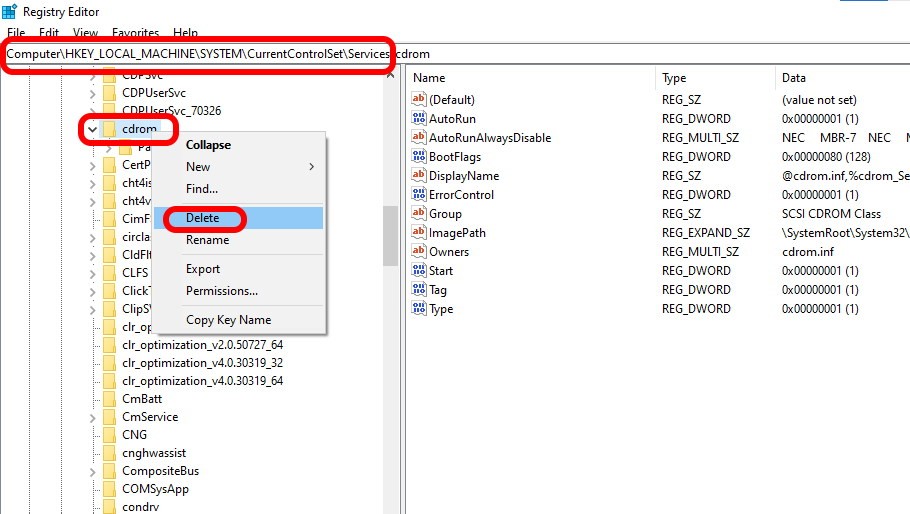
- Click on the START button and type REGEDIT.EXE
- After you click START, you do not need to click anywhere… just start typing
- Click REGEDIT from the top of the menu
- Click YES on the DO YOU WANT TO ALLOWS THIS APP TO MAKE CHANGES TO YOUR DEVICE? prompt.
- If you do not receive that prompt, you have a problem. Most likely, the account you are using is not a administrator of the PC you are on.
- Click YES on the DO YOU WANT TO ALLOWS THIS APP TO MAKE CHANGES TO YOUR DEVICE? prompt.
- Expand HKEY_LOCAL_MACHINE > SYSTEM > CurrentControlSet > Services
- Right click on the device you want to kill and select DELETE
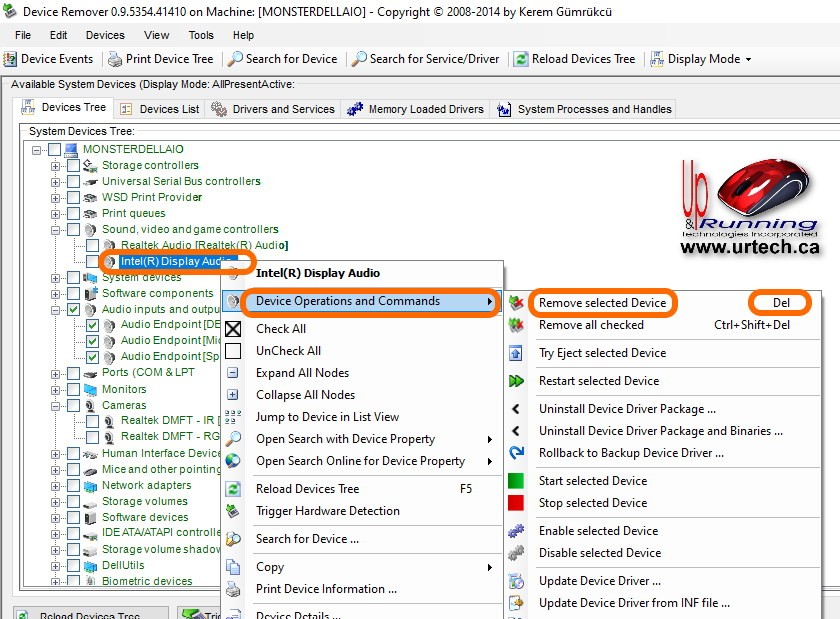
D – UTILITIES
There are several good, free utilities to clean up old or dead devices on your computer. The one we like is no longer in development but is free and still works great.
We have a copy of the last version, from 2014, which you can download from us directly In fact we have two versions of the product:
- DeviceRemoverCleanup64.exe that “installs” (i.e. uses shared files and creates shortcuts)
- DeviceRemover.exe which is “portable” (i.e.it just runs without creating shortcuts or using shared files)
Both of these are ZIP’d so both must be unzipped before using.
- RIGHT CLICK on DEVICEREMOVER.EXE and select RUN AS ADMINISTRATOR
- Click YES on the DO YOU WANT TO ALLOWS THIS APP TO MAKE CHANGES TO YOUR DEVICE? prompt.
- If you do not receive that prompt, you have a problem. Most likely, the account you are using is not a administrator of the PC you are on.
- Click YES on the DO YOU WANT TO ALLOWS THIS APP TO MAKE CHANGES TO YOUR DEVICE? prompt.
- Agree to the license agreement
- Click YES or NO on OPTIMIZATION prompt
- we select NO because we already know what we want to kill, but you might want to click YES
- A black command line window will appear which is just the software enumerating all of the devices
- This can take up to a minute which is a bit disconcerting if you are not expecting it
- Click on the device you want to remove and either:
- press the DELETE key on your keyboard, or
- right click on the device and select DEVICE OPERATIONS AND COMMANDS, then REMOVE SELECTED DEVICE, or
- click on the DEVICES menu at the top and click REMOVE SELECTED
After you have removed the problematic devices, make you either SCAN FOR HARDWARE CHANGES in DEVICE MANAGER or just reboot and check DEVICE MANAGER after to ensure all is well.
If you have any questions or problems, please put them in the comments section below and we will get back tyou.


0 Comments