 Installing and configuring Windows Server Update Services (WSUS) on Server 2016 or Server 2012R2 is straight forward. There are four key steps:
- Add the WSUS Role
- Configure WSUS
- Set a Group Policy to have your PC’s point to the WSUS server for updates
- Approving Updates
To be clear, the process below will take you 20 minutes of work time to complete, but because you have to wait for the install to complete (5-15mins) and then the initial sync to complete (several hours), you will need a day to get your WSUS server functional.
1 – HOW TO INSTALL WSUS:
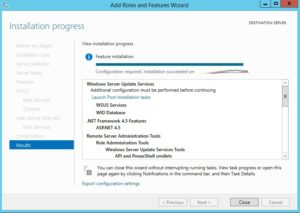 To add the WSUS role launch SERVER MANAGER > MANAGE > ADD ROLES > then click next through to the ROLES and select WSUS. Then click NEXT to the end. Do NOT change the defaults.
The only changes you might want to make are:
- NOT storing the updates locally. There is a check box you can disable. There are three reasons to have a WSUS server:
- Control patch approvals
- Control patch timing
- Avoid the internet traffic and delays of having each office PC download the updates from Microsoft
In my case I am installing WSUS in an office with 9 PC’s and a tiny amount of storage so I have unchecked the STORE UPDATES LOCALLY but that is super-weird.
- Having WSUS use a real SQL server rather than the Windows Internal Database (WID). If you are reading this, you are likely a small company and so the WID is the way to go. You only need a proper SQL server if you have more than 200 PC’s or need to replicate your changes to multiple database servers.
2 – HOW TO CONFIGURE WSUS:
After WSUS is installed. You simply need to launch it (click START and type WSUS or UPDATE and you will see it) to kick off the configuration wizards.
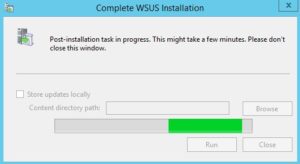 The first wizard is titled COMPLETE WSUS INSTALLATION but the test shows POST INSTALLATION TASKS which is just confirming the location where you are storing your data and that you are ready to start the configuration.
The WSUS database is easy enough to relocate in the future, but you might as well get it right at the start by selecting a location for your database that has at least 100GB free. In some of the WSUS installations I run the WSUS database is >250GB because I include DRIVERS and UPGRADES which really pack on the space requirement. If you are not doing that you will be fine with 100GB.
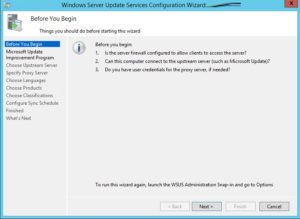
On the WINDOWS SERVER UPDATE SERVICES CONFIGURATION WIZARD screen:
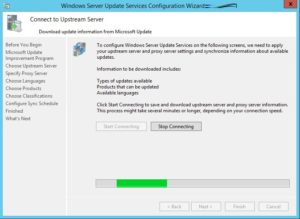 Click NEXT until you get to the CONNECT TO UPSTREAM SERVER option, then click START CONNECTING.
- All this is doing is pulling down a list of the available PRODUCTS (Windows 10, Office 2016, Dot Net…) and CLASSIFICATIONS (i.e. patches, drivers, upgrades…). Microsoft frequently changes these so they need to pull down an initial list of categories for you to choose from.
- Don’t worry, no actual updates are being downloaded
- This step can take 5 to 15 minutes, so go do something else for a while!
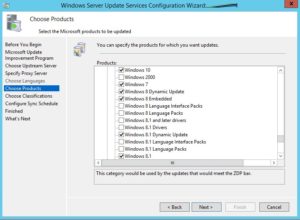 In CHOOSE PRODUCTS, select what you care about updating
- Remember that this server is taking over ALL of the updates for your machines, so if you don’t click the check box here, your machines will not get the updates. So if you have CRM in your environment, but you don’t click CRM here, your PCs will not get the CRM patches.
- I highly recommend that you do not click ALL PRODUCTS. It is a massive list that will make your approvals very hard to get through.
- My sites seldom have more than 20 items selected
- It defaults to adding in ALL of the OFFICE and WINDOWS products and I suggest you uncheck the versions you don’t have
- You might find our explanation of what the various Windows 10 items mean
 In CHOOSE CLASSIFICATIONS, select what you care about updating.
- We normally select everything but DRIVERS and UPGRADES
- Note that build UPGRADES for WINDOWS 10 (i.e. 1703, 1709, 1803…) are listed as FEATURE UPDATES when you actually get to approving your list of patches later on in the process, and those will NOT appear until you have the UPGRADES check box selected
- In CONFIGURE SYNC SCHEDULE, select SYNCHRONIZE AUTOMATICALLY and set it to what you would like
- While drivers, Defender updates and ‘out of band’ patches are released all the time, most patches are released on Patch Tuesday at about Noon Eastern Time.
- Your PC’s will likely check for updates at 2AM and are NOT affected by this time setting
- That time is set later via your Group Policy
- On the FINISHED screen select BEGIN INITIAL SYNCHRONIZATION
- Click NEXT if you want a primer on how to setup your GPO’s
- Click FINISH if you just want to get it done 🙂
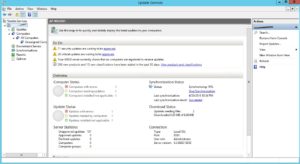
At this point the hard work is done. If WSUS does not launch automatically you can start it yourself and click on your server name (top left) to confirm the system is syncing.
This will likely take a several of hours to get through and you may see FAILED more than once. Just click START SYNCHRONIZATION again; it will pick up where it left off, even though the % will start at zero again.
3 – CREATING WSUS GPOs
 Create a new GPO and EDIT it
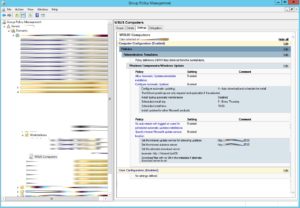
- Expand: Computer Configuration > Policies > Administrative Templates > Windows components > Windows Update
- Set the following GPOs:
- CONFIGURE AUTOMATIC UPDATES
- CONFIGURE AUTOMATIC UPDATING: set to 4 – AUTO DOWNLOAD AND SCHEDULE THE INSTALL
- SCHEDULED INSTALL DAY (and TIME): set to what you would like
- Enable the INSTALL UPDATES FOR OTHER MICROSOFT PRODUCTS
- SPECIFY INTRANET MICROSOFT UPDATE SERVICE LOCATION
- set the first two fields to the http://<HostNameOfYourServer>:8530
- ALLOW AUTOMATIC UPDATES IMMEDIATE INSTALLATION
- set to ENABLED
- NO AUTO-RESTART WITH LOGGED ON USERS FOR THE SCHEDULED AUTOMATIC UPDATES INSTALLATIONS
- Set to ENABLED
- CONFIGURE AUTOMATIC UPDATES
 At this point you can go to a PC that this GPO applies to and either reboot it or just run a GPUPDATE /FORCE to get it to point to your WSUS server.
If you are having problems and want to verify it, just open the registry editor on that PC and check HKLM\software\policies\windows\WindowsUpdate\WUServer to confirm you see your WSUS server is specified.
If you have any questions, THIS Microsoft article does a good job of explaining WSUS GPO’s.
4 – HOW TO CONFIGURE THE WSUS CONSOLE
Once you have let your WSUS server sync for a while and you have a few of your PC’s pointing the the WSUS server, you need to approve some updates.
 Note that steps 3 and 4 below cannot be completed during a sync, so you can either wait for the initial sync to finish (a few hours) or you can stop the sync by clicking on the name of your server and then clicking STOP SYNCHRONIZATION (middle right). You will not damage your installation. You can click START SYNCHRONIZATION any time you want after that at it will continue from where it left off, even though the % will start at zero again.
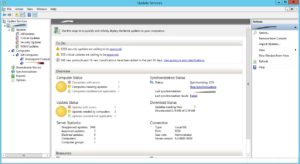 In the UPDATE SERVICES console, expand COMPUTERS
- most likely you will want to create one or two computer groups so you can push some updates to a test group before everyone else
- just RIGHT click on ALL COMPUTERS and select ADD COMPUTER GROUP then name it.
- you can create as many of these as you wish
- Click ALL COMPUTERS, change the drop down filter (at the top) to ANY and click REFRESH
- RIGHT click on any PC (or a select a bunch and then right click) and select CHANGE MEMBERSHIP
- Click checkbox beside what group you want it to go into
- In the UPDATE SERVICES console, expand UPDATES > ALL UPDATES
- Set the filter drop down boxes at the top from APPROVAL = UNAPPROVED and STATUS = ANY
- Select all the updates you like then RIGHT click on them and select APPROVE
- In the APPROVE UPDATES windows select click the drop down to the left of the group you want to assign the updates to and select APPROVE FOR INSTALL
- PRO TIP: If you want to approve the updates for ALL computers, click the drop down to the left of the ALL COMPUTERS, then select BOTH, APPROVE FOR INSTALL and APPLY TO CHILDREN
- There may be some updates you want to always approve immediately (like Windows Defender updates) so:
- In the UPDATE SERVICES console, expand OPTIONS (at the bottom left)
- Click SYNCHRONIZATION SCHEDULE and set the SYNCHRONIZATIONS PER DAY to whatever makes you happy
- In my case use 12 sync’s per day so that it is checking for updates (particularly Defender updates) every other hour
- Click OK
- Click AUTOMATIC APPROVALS
- Click NEW RULE
- Click WHEN AN UPDATE IS IN A SPECIFIC PRODUCT
- Use the check box at the very top to de-select everything
- Select the product you care about, in my case WINDOWS DEFENDER, and click OK
- Periodically, especially after your first round of updates, you should expand OPTIONS and click SERVER CLEANUP WIZARD to dump all the outdated, replaced updates and computers that have not checked in in a long time.


0 Comments