If you want to use Group Policy to configure the 10 UAC related group polices so a Windows 7 client will be set to the third level on the slider bar:
“Default – Notify me only when programs try to make changes to my computer. Don’t notify me when I make changes to Windows settings.”
open your Group Policy Management tool and either create a new policy or edit an existing one (note I would NOT change the DEFAULT DOMAIN POLICY to protect against maiking a mistake). Then expand to:
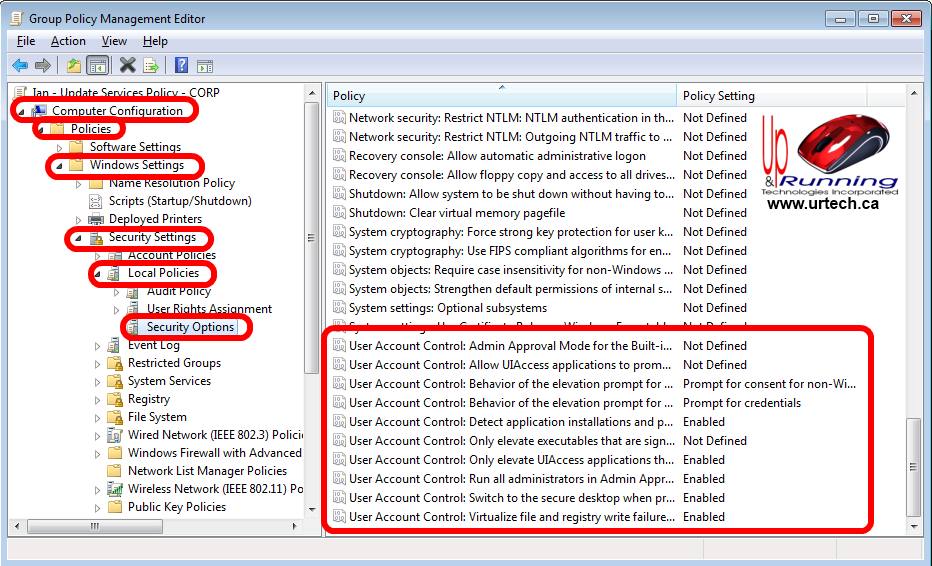
COMPUTER CONFIGURATION > POLICIES > WINDOWS SETTINGS > SECURITY SETTINGS > LOCAL POLICIES > SECURITY OPTIONS and make the following changes:
Admin Approval Mode for the Built-in Administrator account = Disabled
Allow UIAccess applications to prompt for elevation without using the secure desktop = Disabled
Behavior of the elevation prompt for administrators in Admin Approval Mode = Prompt for consent for non-Windows binaries
Behavior of the elevation prompt for standard users = Prompt for credentials
Detect application installations and prompt for elevation = Enabled
Only elevate executables that are signed and validated = Disabled
Only elevate UIAccess applications that are installed in secure locations = Enabled
Run all administrators in Admin Approval Mode = Enabled
Switch to the secure desktop when prompting for elevation = Enabled
Virtualize file and registry write failures to per-user locations = Enabled

7 Comments
hamid alkindi · November 23, 2017 at 7:33 am
I have the same problem in my domain computer and I need to know how to solve this issue without helping from my office IT
Aaditya · October 31, 2017 at 10:34 am
It’s fixed now, after doing this, disable fast boot then it will be normal.
Thanks once again
Aaditya · October 31, 2017 at 6:35 am
Thank you for this article, but my laptop still messed up because of changing my UAC settings, seems like I have to install Windows again.
Littleroot · March 11, 2016 at 12:00 am
Very good. Previous admin had used wrong settings and I wanted to get back to default. Thank you
ITinAfrica · November 9, 2015 at 11:29 pm
What are you posting, this are the default setting on Win 10 GPO. This is not help full in anyway
Ian Matthews · December 27, 2015 at 4:45 pm
Well, It is useful to me because I want to undo any setting changes that others many have made to UAC. The DEFAULT level is the correct level for most environments.
EVG · September 2, 2013 at 8:50 pm
Wow, that’s what I was seeking for, what a information!
existing here at this weblog, thanks admin of this web page.