This is the followup to how to add drivers to a Windows PE 2.0 (Vista) .WIM file. Today I needed to add a network driver to a Windows 7 PE 3.0 Boot Image I had in my Windows Deplopyement Services (WDS) 2008 Server. After two hours of banging though half baked explainations a blogs I figured out the process.
The nut of the problem is that the old Vista tools (WAIK and Deployment Workbench) have been updates with REQUIRED new tools. Basically the PEIMG has been replaced with DISM. In fact, as you will see, DISM will even do the work
DISM Import Drivers into Windows 7 PE3
of IMAGEX. In case you are wondering DISM stands for Deployment Image Servicing and Management tool… really great name… I suppose it would have made it too easy if they had just updated IMAGEX and PEIMG with new commands… but I digress.
The first thing you have to do is source the Deployment Workbench 2010 (yes, that is new and the old version with NOT work. You can read/watch THIS if you have no idea how to get that started; the only thing to pay attention to is at the 1 minute mark in the video where it tells you how to source the WAIK (Windows Automated Installation Kit.) Once you have this you are good to go.
- Get your .WIM file copied to your PC. file either:
- from the Windows 7 DVD (boot.wim or image.wim in the sources directory) or
- pull it out of your WDS Server (if you have one, by right clicking on the image in question and selecting EXPORT)
- Create a folder called C:\TEMP. Then create two subfolders; one called DRIVERS and the other called MOUNT
- Move your .WIM file to C:\TEMP\ and rename it CUSTOMBOOT.WIM
- the rename is not required but I find it keeps everything straight in my head
- Download the drivers you need and put them in their own subfolder under C:\TEMP\DRIVERS (i.e. C:\TEMP\DRIVERS\ETHERNET\ and C:\TEMP\DRIVERS\SOUND\ ) .
- Don’t put the driver .EXE file into that folder, you need to expand that .EXE and get the driver files out of it.
- WinRAR and WinZIP work well for extracting .EXE files containing drivers. For WinZip you simply drag the .EXE with the RIGHT MOUSE a few pixels and you will see WINZIP, EXTRACT TO… in the context menu.
- Make sure you do not change the folder structure your driver .EXE file may have created.
- Use Windows 7, Vista (or at least WinXP drivers); DOS drivers will NOT work.
- Click Start. Microsoft Windows AIK, Deployment Tools Command Prompt.
- This will set a pile of software (i.e. DISM) in your “PATH” so you won’t have to search for it.
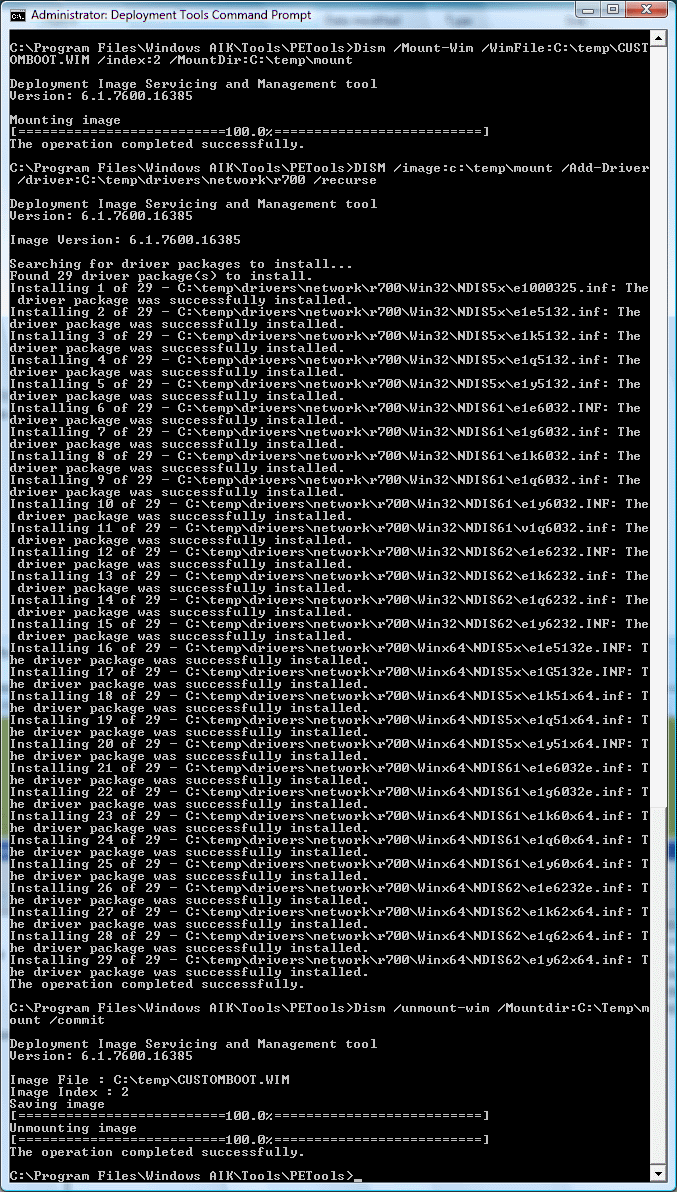
- Mount (i.e. expand) CUSTOMBOOT.WIM with the following command:
- Dism.exe /mount-wim /wimfile:C:\temp\customboot.wim /index:2 /mountdir:C:\temp\mount
- NOTE: if you are working with a Win 7 image (or a Win7 WDS Capture image [not deploy PE3.0]) then you may need to change index number to from a 2 to a 1
- Inject your drivers using the following command:
- dism /image:C:\Temp\mount /add-driver /driver:C:\temp\drivers\nic\ /recurse
- /reurse is a wild card that tell DISM to search all of the subfolders for .INF files and load them
- If you only want to load one driver (which would be odd because loading all the drivers makes more sense) be sure to type in the full path the .INF in question i.e. “…ers\nic\rt64win7.inf”
- You will receive the following error if you do not enter the correct path and I would not use spaces in the path… use short file names:
Error: 123 The filename, directory name, or volume label syntax is incorrect. or
Error: 123 Unable to access the image file
- dism /image:C:\Temp\mount /add-driver /driver:C:\temp\drivers\nic\ /recurse
- Commit your update and recompress your updated image using the following command:
- Dism /unmount-wim /Mountdir:C:\Temp\mount /commit
- Congratulations you are done! If you want to push this to a Windows Deployment Services (WDS) Server read on.
- Start your WDS Console, right click on the boot image you wish to update, and select DISABLE
- Right Click on that same boot image and select REPLACE IMAGE. The browse to wherever you have your CUSTOMBOOT.WIM and select it.
- in my case I copied CUSTOMBOOT.WIM across the network from the VM I created it on to my W2003 WDS server prior to the REPLACE IMAGE STEP
- this process will update the existing BOOT.WIM and REENABLE it. There is no need restart services
- You could delete your CUSTOMBOOT.WIM but I keep mine in case I want to add more drivers in the future.
I found THIS and THIS article to be useful, in case you have any other questions.

4 Comments
Victor James · January 6, 2018 at 9:14 am
Hello, I bought a new hp proliant ml10 gen9 server for my company to install Windows server 2008 standard and sap netwear but during installation process the mouse and keyboard hangs even though it works well in bios. I tried installing windows server 2012 and it worked fine. I did my little research why my keyboard and mouse hangs when installing 2008 and got to understand that my server came with USB 3.0 chip which was missing in 2008 and the only solution was for me to inject the driver into my iso (install. Wim and boot. Wim) I have tried different methods on driver injection online but was only able to mount the image, get an error:50 when trying to add drivers. Funny enough I was able to Inject usb 3.0 drivers into windows server 2008 R2 but need Windows server 2008 standard edition. So is any solution out there on how to inject usb 3.0 drivers into windows server 2008 standard?
Ian Matthews · January 6, 2018 at 8:29 pm
Hi Victor;
Three things come to mind:
1: I no longer have access to Server 2008 R1 so I cannot help directly with that beyond what we wrote
2: Is there a way to disable USB3 in the BIOS
3: If it is a server, you will have space for an add in card that for USB2 (yes, you can still buy them on eBay) so I would try that
I hope that helps.
SOLVED: How to Add Drivers in WDS Windows Deployment Services - Up & Running Technologies, Tech How To's · October 1, 2018 at 1:41 pm
[…] Windows 7 & 8 how-to-inject-drivers-into-windows-pe-3-0-wim-in-5-minutes-or-into-a-windows-7-or-2008-r2-image […]
SOLVED: How to Add Drivers in WDS Windows Deployment Services - Up & Running Technologies Calgary · March 12, 2014 at 2:32 pm
[…] Windows 7 & 8 how-to-inject-drivers-into-windows-pe-3-0-wim-in-5-minutes-or-into-a-windows-7-or-2008-r2-image […]