SharePoint 2013 was much easier to install than its predecessors but to get a site going is still complex, mostly because of the a-typical names Micosoft has developed to describe sites and pages. This cookbook is pretty straight forward and you should be able to go from nothing to working on your site within 2 hours?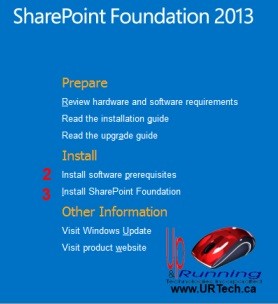
The first thing to know is that SharePoint 2013 Foundation is NOT a part of Server 2012 or 2012 R2, it is a download. The instructions below assume you have a Server 2008 R2 or Server 2012 installation already complete and Windows Updated.
Before you start, you might find THIS 5 minute video to be quite useful as a primer (I did!)
- Download SharePoint 2013 Foundation from HERE.
- Launch the downloaded file SHAREPOINT.EXE and select INSTALL SOFTWARE PREQUISITES
- this takes some time and install a massive amount of stuff… just follow the wizard
- a reboot required and the install continues after that reboot

- when complete just click FINISH
- Launch the downloaded file SHAREPOINT.EXE and select INSTALL SHAREPOINT FOUNDATION
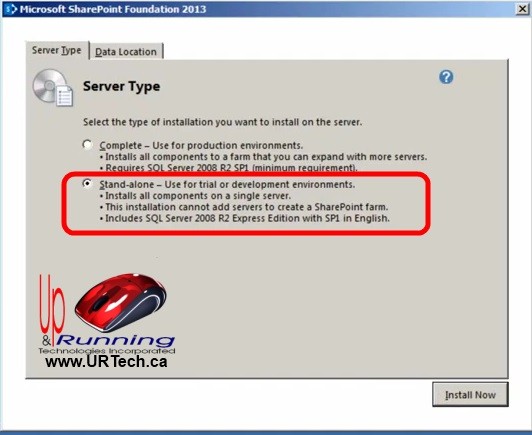
- Approve the license agreement and select STAND ALONE on the SERVER TYPE screen
- At the RUN THE CONFIGURATION WIZARD screen, make sure the check in ON (i.e. yes, you really want to run this wizard).
- When the Configuration Wizard is complete, log into the CENTRAL ADMINISTRATION page by searching the word SHAREPOINT on the tiles screen of just browsing to the site (http://<replace-with-YOUR-servers-host-name:29866/ )
- Enter any administrators account information when prompted
- yes this will take a while to first time in so don’t panic
- If it starts without anything scary, close it
- Run a WINDOWS UPDATE and accept everything for install.
- I needed run through Windows Update twice to get all of the patches and reboot in between as requested
- Completely unrelated to this install is the requirement to go to your domains DNS server and add in a A record for what your new Sharepoint Site/Web App will be.
- In this example I am using “ThePoster” as a new Web App so I would need to go to my DNS and addin THEPOSTER pointing to the IP address of my Sharepoint server.
- Connect to CENTRAL ADMINISTRATION (see step 6)
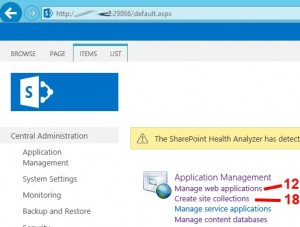
- Click MANAGE WEB APPLICATIONS
- Click the NEW button (top left)
- You cannot easily rename a “web app” and you likely don’t want to have an URL like http://<servers-host-name>
- The easiest way to deal with this is to delete SHAREPOINT – 80 WebApp and create a new one with the URL you want
- In my case I kept the default SHAREPOINT – 80 WebApp until I had completed all the steps so I could use it as reference, but you could delete it at any time
- In the CREATE A NEW IIS WEB SITE enter the name of the URL you want (like ‘ThePoster’)
- complete the form as you see fit.
- In my case I wanted to use host headers and not ports, so I put the URL in the HOST HEADER field (like ‘ThePoster’)
- When the WEB APPLICATIONS window reappears, click on your new WebApp’s name and select GENERAL SETTINGS
- set the TIME ZONE, QUOTA and anything else you would like
- When the WEB APPLICATIONS window reappears, click on your new WebApp’s name and select USER POLICY
- click ADD USERS and add in whatever groups and users you see fit
- in my case I set DOMAIN ADMINS to FULL CONTROL
- I also set AUTHENTICATED USERS to FULL READ
- click ADD USERS and add in whatever groups and users you see fit
- Click the APPLICATIONS MANAGEMENT link in the menu (on the left)
- Click CREATE SITE COLLECTIONS
- Make sure your new Web Application’s name is in the drop down at the top
- Set a title and pick a template
- TEAM SITE is a good place to start if you don’t know what you are doing yet
- Set a PRIMARY SITE COLLECTION ADMNISTRATOR and a SECONDARY
- Surf to your site on a client PC in your domain (like http://ThePoster )
- This will take some time as the server needs to build a number of .ASP pages… don’t worry, it will work!
- This also assumes you are logged onto that PC as the administrator or that you did allow AUTHENTICATED USERS as you see in steps 16.1.2
- If you try to surf to your site you the server it will likely prompt you for your username and password, but no matter what you enter, you will likely be prompted again and again. The solution is to either DISABLELOOPBACKCHECK completely or set it to be ignored for your site (much safer). I have written a quick article on this HERE.

Congratulations! You now have your own Sharepoint 2013 Foundation server and site up and running. Now you can blow your brains out customizing it with webparts, text and video.
Enjoy!

0 Comments