October will be the last (unpaid) update available for Windows Server 2012R2 which means if you patch your servers every quarter, you have until January 2024 to upgrade them… if you want to stay safe.
We have upgraded many servers from Server 2012R2 to Server 2016 and while the process is simple we thought it was worth documenting because there are a few unexpected bumps.
MYTH: In-Place Upgrades of Windows Server Is Not Support By Microsoft
The fact is that Microsoft fully supports in-place upgrades of Windows servers. They simply don’t recommend it and if you have apps that are not supported on Windows Server 2016, that is your problem, not theirs.
What is true is that Microsoft has additional requirement to do an in-place upgrade on any server that is running in Azure.
They don’t they recommend upgrading because some features of the old operating system are maintained after an upgrade to allow for compatibility. From Microsoft’s end that’s a bad thing but from your end that’s a very good thing and probably the very reason why you want to do an in place upgrade. You want your old servers to work just using the new operating system.
A clean install is always the ‘cleaner’ way to go, but it is also dramatically more complex and usually unnecessary.
Steps How To Upgrade From Windows Server 2012R2 to Server 2016
PREWORK
Before you actually start the upgrade there are ten things you really should do first:
- Note the IP addresses (and possibly the MAC addresses) of your NIC’s, and take note of any special hardware configurations you have.
- especially with VM’s it is common for ‘new’ NIC’s to be installed causing you to loose your existing IP addresses
- We typically just export the configuration to a file using the CMD
ipconfig /all > c:\temp\pre-ipconfig.txt - You also might want to take note of which services were actually running
- Update the operating system with any patches that are pending in Windows Update
- Update any applications you have running on that server to reduce the likelihood that they will be incompatible with the Windows Server 2016
- If this is a virtual machine, upgrade any VMTools to the latest build
- Clean up the current install as much as possible in advance and make as much free space as possible:
- Uninstall any unused software or unnecessary utilities
- Delete any temporary files
- ie. often admins have C:\TEMP folder that is full of old junk
- Delete any old user profiles
- Go to C:\WINDOWS\TEMP, press CNTL+A, the press the DELETE key
- Contrary to what you may have heard this will not cause a problem. Files that are currently in use will simply fail to delete and that’s a good thing
- Empty the Recycle Bin
- Now is a great time to upgrade the current hardware as much as is reasonable:
- If your machine has 4GB of RAM, spring the big $100 and double it to 8GB 🙂
- Perhaps add a few more CPU cores
- Move the disk from spinning array to an SSD
- Take a full backup of the machine. Nearly everyone is running their servers as virtual machines so the easiest thing to do here is simply take a snapshot just before you start the upgrade, so you can roll back if something goes wrong.
- Know how to disable your antivirus / antimalware tools BEFORE you start
- Source an ISO or an actual DVD of Server 2016
WHAT COULD GO WRONG WITH AN INPLACE UPGRADE?
You are changing the entire operating system, so things could definitely go wrong. That being said I have never had an in place upgrade fail to the point where I needed to roll back.
- It’s possible that some application you have won’t work on the new operating system so you need to validate that in advance as much as you can
- If the upgrade files end up on a part of the hard drive that is bad, it is possible the whole machine will just crash and be unrecoverable
- If you are still on spinning disk, now is a great time to check it with even old tools like chkdsk and to improve the layout using defrag
- If there is a power outage or something forces the machine to power off during the upgrade, it could be ugly to recover
STEPS TO UPGRADE WINDOWS SERVER 2012R2 TO SERVER 2016
- Do all of the PREWORK specified above
- Reboot the server and make sure it comes up without errors
- Click START, type WINVER.EXE and press ENTER so you know which version of Server 2012R2 you have now as you will need to choose the same version later in the process
- Disable any antivirus / antimalware / monitoring software
- Turn off any ‘heavy’ services that are not necessary
- i.e. if the server runs SQL, you can stop the SQL services before the upgrade starts just to free up resources and make the upgrade run faster
- you do not NEED to stop any services in advance
- Mount the ISO or the DVD and launch SETUP.EXE
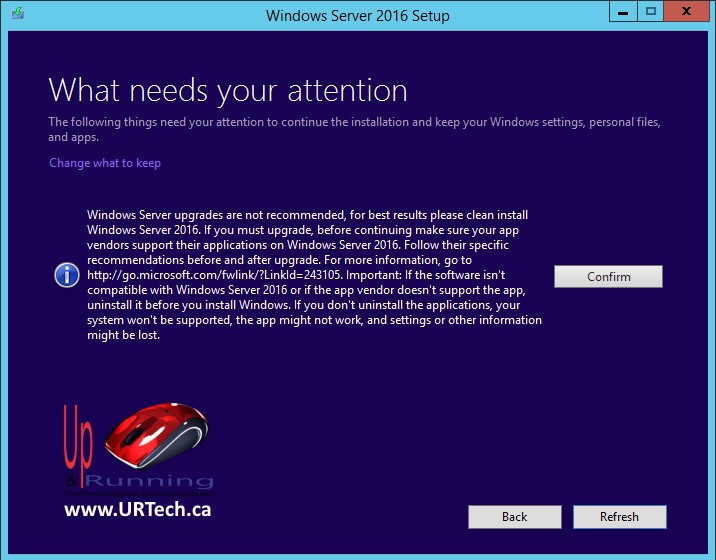
- Click next through all of the defaults being careful to select
- KEEP PERSONAL FILES AND APPS
- The version of Windows Server 2016 that matches your current Windows Server 2012R2.
- For most people that are running Server 2012R2 in a virtual machine, they will select WINDOWS SERVER 2016 STANDARD DESKTOP EXPERIENCE
- DOWNLOAD AND INSTALL UPDATES
- This prompt comes up twice, once early in the process to upgrade the install files on the ISO/DVD and later to update the new Server 2016 OS
- This prompt comes up twice, once early in the process to upgrade the install files on the ISO/DVD and later to update the new Server 2016 OS
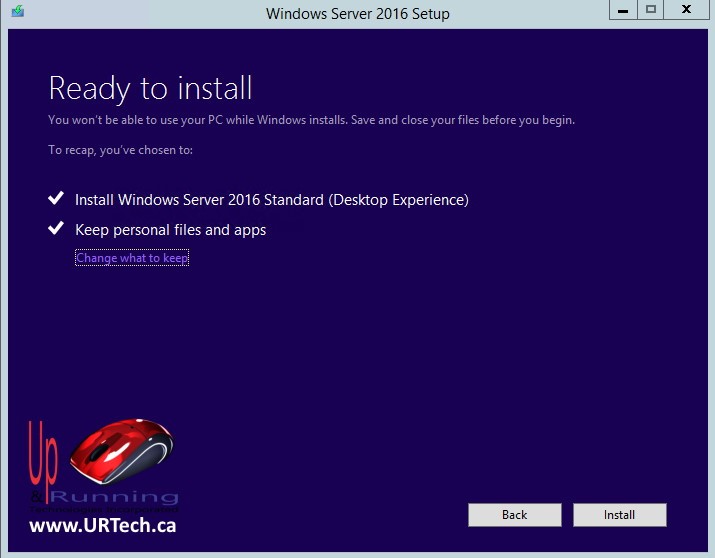
In most cases, the last screen before the in-place upgrade will look like:
HOW LONG DOES THE UPGRADE FROM 2012R2 TO 2016 TAKE?
Typically the upgrade will take anywhere from 30 to 90 minutes to complete but do not panic it if takes longer… just keep waiting.
CREDSSP ERROR on RDP
After the upgrade is complete you will be scared or annoyed (or both!) to find that you cannot RDP with the server and will see the CredSSP Error:
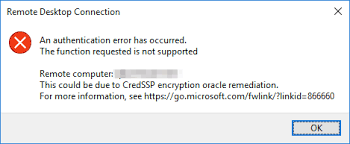
Fortunately the CredSSP error is easy to fix. You just need to patch your Windows Server 2016. The easiest way to do this is through Windows Update, which you need to run next anyway.
However, if you get stuck on a server that could not see the internet, like our last upgrade, you can download KB4103723 directly from the Microsoft catalog.
CHECK NETWORK SETTINGS
This is the point where you are glad you saved your NIC information before you started. If you have “new” NIC’s they will be set to DHCP and that is likely a very bad thing, so you will need to correct them.
PATCH PATCH PATCH, TEST TEST TEST
Typically, there will be four large patches that need to be applied after the upgrade, including .NET patches and Cumulative Updates.
Now is a great time to:
- check your services and make sure they are happy
- check your applications
- activate Windows Server 2016
- confirm that other servers and desktops can talked to it (i.e. check file shares, printing…)
Do one last reboot and make sure everything comes up as you expect.
Go have a nice cold drink and relax because Server 2016 does go complete end of life until 2027.


0 Comments